KVM 是Kernel-based Virtual Machine的简称,是一个开源的系统虚拟化模块,自Linux 2.6.20之后集成在Linux的各个主要发行版本中,KVM目前已成为学术界的主流 VMM (virtual machine monitor,虚拟机监视器,也称为hypervisor)之一。https://www.redhat.com/zh/topics/virtualization/what-is-KVM http://www.ibm.com/developerworks/cn/linux/l-using-kvm/ )
宿主机环境准备: KVM需要宿主机CPU必须支持虚拟化功能,因此如果是在vmware workstation上使用虚拟机做宿主机,那么必须要在虚拟机配置界面的处理器选项中开启虚拟机化功能(VMware支持嵌套虚拟化,而KVM不支持,大部分云服务器如阿里云就是基于KVM技术二次研发制作的,所以云服务器都不支持从中再建虚拟机)。1 2 3 [root@localhost ~]# grep -Eo "vmx|svm" /proc /cpuinfo | wc -l vmx vmx
KVM软件包安装 在Ubuntu 18.04中:https://ubuntu.com/server/docs/virtualization-libvirt 1 2 3 apt install qemu-kvm virt-manager libvirt-daemon-system kvm-ok
1 2 INFO: /dev/ kvm existsKVM acceleration can be used
CentOS 7.X:1 yum install qemu-kvm qemu-kvm-tools libvirt libvirt-client virt-manager virt-install
1 2 systemctl start libvirtd systemctl enable libvirtd
网络环境配置 为了让三个节点间虚拟机可以直接相互之间通信,需要将KVM上的虚拟机以桥接模式与宿主机的网卡连接,这就需要我们提前在宿主机上配置好网桥。若宿主机为Ubuntu18.04: 1 sudo vim /etc/netplan/01 -netcfg.yaml
1 2 3 4 5 6 7 8 9 10 11 12 13 14 15 16 17 18 19 20 21 22 23 24 25 26 27 28 network: version: 2 renderer: networkd ethernets: eth0: dhcp4: no dhcp6: no eth1: dhcp4: no dhcp6: no bridges: br0: dhcp4: no dhcp6: no addresses: [172.18.0.75/16] gateway4: 172.18 .0 .1 nameservers: addresses: [180.76.76.76] interfaces: - eth0 br1: dhcp4: no dhcp6: no addresses: [10.0.0.75/16] interfaces: - eth1
修改网卡配置后,使用netplan apply命令使配置文件的修改生效
若宿主机为CentOS: 1 cd /etc/ sysconfig/network-scripts/
1 2 3 4 5 6 TYPE =EthernetBOOTPROTO =staticNAME =eth0DEVICE =eth0ONBOOT =yes BRIDGE =br0
1 2 3 4 5 6 TYPE =EthernetBOOTPROTO =staticNAME =eth1DEVICE =eth1ONBOOT =yes BRIDGE =br1
1 2 3 4 5 6 7 8 9 TYPE =BridgeBOOTPROTO =staticNAME =br0DEVICE =br0ONBOOT =yes IPADDR =172.18 .32.75 NETMASK =255.255 .0.0 GATEWAY =172.18 .0.1 DNS1 =180.76 .76.76
1 2 3 4 5 6 7 TYPE =BridgeBOOTPROTO =staticNAME =br1DEVICE =br1ONBOOT =yes IPADDR =10.0 .0.75 NETMASK =255.255 .0.0
重启网络服务,生效配置1 systemctl restart network
ip a命令或ifconfig查看桥接网卡是否生效
KVM虚拟机创建 创建虚拟磁盘 1 2 3 [root@localhost ~]# ll /var/lib/libvirt/images/ #默认保存虚拟机磁盘的路径 total 0 [root@localhost ~]#
使用qemu-img create命令可以创建磁盘,如果创建raw格式磁盘文件,则理解占据实际大小,若创建qcow2稀疏格式磁盘,则磁盘文件会随着使用的增大而增大1 qemu-img create -f raw /var/lib /libvirt /images /CentOS7 .raw 10G 建磁盘
1 2 ll -h /var/lib /libvirt /images /CentOS7 .raw -rw-r--r-- 1 root root 10 G Nov 29 16 :34 /var/lib /libvirt /images /centos .raw
1 qemu-img create -f qcow2 /var/lib /libvirt /images /CentOS7 .qcow2 10G
1 2 ll -h /var/lib /libvirt /images /CentOS7 .qcow2 -rw-r--r-- 1 root root 193 K Nov 29 16 :36 /var/lib /libvirt /images /centos .qcow2
我们选用qcow2格式的磁盘,先创建H1虚拟机,1 qemu-img create -f qcow2 /var/lib /libvirt /images /H1 .qcow2 10G
创建虚拟机 先导入ISO光盘镜像文件,可以使用共享存储上的ISO文件,也可本机导入,本机上传的话一般习惯性放到/usr/local/src/目录下virt-install命令创建虚拟机,参数可virt-install --help查看帮助信息
1 2 3 4 5 6 7 8 9 10 11 12 13 14 15 16 17 18 19 20 21 22 23 24 25 26 27 28 29 30 31 32 33 34 35 36 37 38 39 40 41 42 43 44 45 46 47 48 49 50 51 52 53 54 55 56 57 58 59 60 61 62 63 64 65 66 67 68 69 70 71 72 73 74 75 76 77 78 79 80 81 82 83 84 85 86 87 88 89 90 91 92 93 94 95 96 97 98 99 100 101 102 103 104 105 106 107 108 109 110 111 112 113 114 115 116 117 118 119 120 121 122 123 124 125 126 127 128 129 130 131 132 usage: virt-install --name NAME --ram RAM STORAGE INSTALL [options] 使用指定安装介质新建虚拟机。 optional arguments: -h, --help show this help message and exit --version show program's version number and exit--connect URI 使用 libvirt URI 连接到 hypervisor通用选项: -n NAME, --name NAME 客户端事件名称 --memory MEMORY 配置虚拟机内存分配。例如:--memory 1024 (in MiB) --memory 512,maxmemory=1024--vcpus VCPUS 为虚拟机配置的 vcpus 数。例如:--vcpus 5--vcpus 5,maxcpus=10,cpuset=1-4,6,8--vcpus sockets=2,cores=4,threads=2,--cpu CPU CPU 型号及功能。例如:--cpu coreduo,+x2apic--cpu host--metadata METADATA 配置虚拟机元数据。例如:--metadata name=foo,title="My pretty title" ,uuid=... --metadata description="My nice long description" 安装方法选项: --cdrom CDROM 光驱安装介质-l LOCATION, --location LOCATION 安装源(例如:nfs:host:/path、http://host/path ftp://host/path) --pxe 使用 PXE 协议从网络引导--import 在磁盘映像中构建虚拟机--livecd 将光驱介质视为 Live CD-x EXTRA_ARGS, --extra-args EXTRA_ARGS 附加到使用 --location 引导的内核的参数 --initrd-inject INITRD_INJECT使用 --location 为 initrd 的 root 添加给定文件 --os-variant DISTRO_VARIANT在其中安装 OS 变体的虚拟机,比如 'fedora18'、'rhel6'、'winxp' 等等。 --boot BOOT 配置虚拟机引导设置。例如:--boot hd,cdrom,menu=on--boot init=/sbin/init (for containers) --idmap IDMAP 为 LXC 容器启用用户名称空间。例如:--idmap uid_start=0,uid_target=1000,uid_count=10设备选项: --disk DISK 使用不同选项指定存储。例如:--disk size=10 (new 10GiB image in default location) --disk /my/existing/disk ,cache=none--disk device=cdrom,bus=scsi--disk= ?-w NETWORK, --network NETWORK 配置虚拟机网络接口。例如: --network bridge=mybr0--network network=my_libvirt_virtual_net--network network=mynet,model=virtio,mac=00:11... --network none--network help --graphics GRAPHICS 配置虚拟机显示设置。例如:--graphics vnc--graphics spice,port=5901,tlsport=5902--graphics none--graphics vnc,password=foobar,port=5910,keymap=ja--controller CONTROLLER配置虚拟机控制程序设备。例如: --controller type=usb,model=ich9-ehci1--input INPUT 配置虚拟机输入设备。例如:--input tablet--input keyboard,bus=usb--serial SERIAL 配置虚拟机串口设备--parallel PARALLEL 配置虚拟机并口设备--channel CHANNEL 配置虚拟机沟通频道--console CONSOLE 配置虚拟机与主机之间的文本控制台连接--hostdev HOSTDEV 将物理 USB/PCI/etc主机设备配置为与虚拟机共享 --filesystem FILESYSTEM将主机目录传递给虚拟机。例如: --filesystem /my/source/dir ,/dir/in/guest --filesystem template_name,/,type=template--sound [SOUND] 配置虚拟机声音设备模拟--watchdog WATCHDOG 配置虚拟机 watchdog 设备--video VIDEO 配置虚拟机视频硬件。--smartcard SMARTCARD配置虚拟机智能卡设备。例如: --smartcard mode=passthrough--redirdev REDIRDEV 配置虚拟机重定向设备。例如:--redirdev usb,type=tcp,server=192.168.1.1:4000 --memballoon MEMBALLOON配置虚拟机 memballoon 设备。例如: --memballoon model=virtio--tpm TPM 配置虚拟机 TPM 设备。例如:--tpm /dev/tpm --rng RNG 配置虚拟机 RNG 设备。例如:--rng /dev/random --panic PANIC 配置虚拟机 panic 设备。例如:--panic default虚拟机配置选项: --security SECURITY 设定域安全驱动器配置。--numatune NUMATUNE 为域进程调整 NUMA 策略。--memtune MEMTUNE 为域进程调整内粗策略。--blkiotune BLKIOTUNE为域进程调整 blkio 策略。 --memorybacking MEMORYBACKING为域进程设置内存后备策略。例如: --memorybacking hugepages=on--features FEATURES 设置域 XML。例如: --features acpi=off--features apic=on,eoi=on--clock CLOCK 设置域 XML。例如: --clock offset=localtime,rtc_tickpolicy=catchup--pm PM 配置 VM 电源管理功能--events EVENTS 配置 VM 生命周期管理策略--resource RESOURCE 配置 VM 资源分区(cgroups)虚拟化平台选项: -v, --hvm 客户端应该是一个全虚拟客户端 -p, --paravirt 这个客户端一个是一个半虚拟客户端 --container 这台虚拟机需要一个容器客户端--virt-type HV_TYPE 要使用的管理程序名称(kvm、qemu、xen 等等) --arch ARCH 模拟的 CPU 构架--machine MACHINE 要模拟的机器类型其它选项: --autostart 引导主机时自动启动域。--wait WAIT 等待安装完成的分钟数。--noautoconsole 不要自动尝试连接到客户端控制台--noreboot 完成安装后不要引导虚拟机。--print-xml [XMLONLY]输出所生成域 XML,而不是创建虚拟机。 --dry-run 完成安装步骤,但不要创建设备或者定义虚拟机。 --check CHECK 启用或禁用验证检查。例如:--check path_in_use=off--check all=off-q, --quiet 禁止无错误输出 -d, --debug 输入故障排除信息
我们使用命令创建虚拟机(网卡配置选择default的话默认是nat模式)1 2 3 4 5 6 7 virt-install --virt-type kvm \ --name H1 --ram 1024 --vcpus 2 \ --cdrom=/usr/local /src/ CentOS-7 -x86_64-Minimal-1908 .iso \ --disk=/var/lib /libvirt/images /H1.qcow2 \ --network network=default \ --graphics vnc,listen=0 .0 .0 .0 \ --noautoconsole
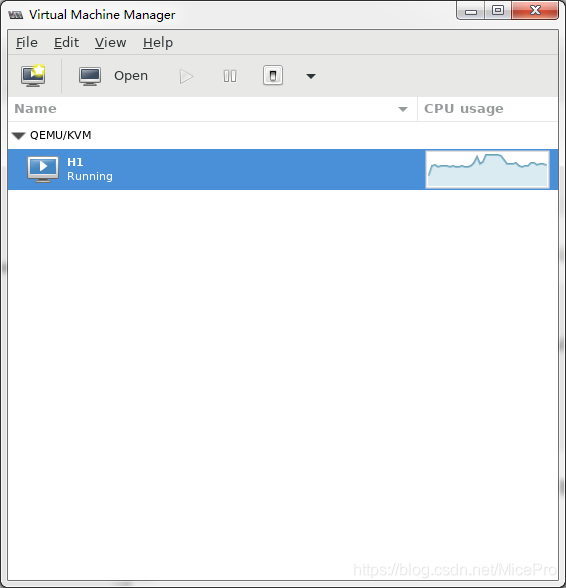
输入virt-manager可开启xshellmanager的终端窗口如下图virt-manage不能启动xmanager的窗口,检查一下项目
确认已经安装xmanager
xshell文件—属性—连接—隧道—设置转发x11到xmanager
ssh服务配置文件是否开启X11Forwarding选项 设置为yes
以上都没问题,建议重装xmanager,我就是配置都对,但是输入virt-manage命令没反应,重装了一下xmanager和xshell之后就可以正常使用了。
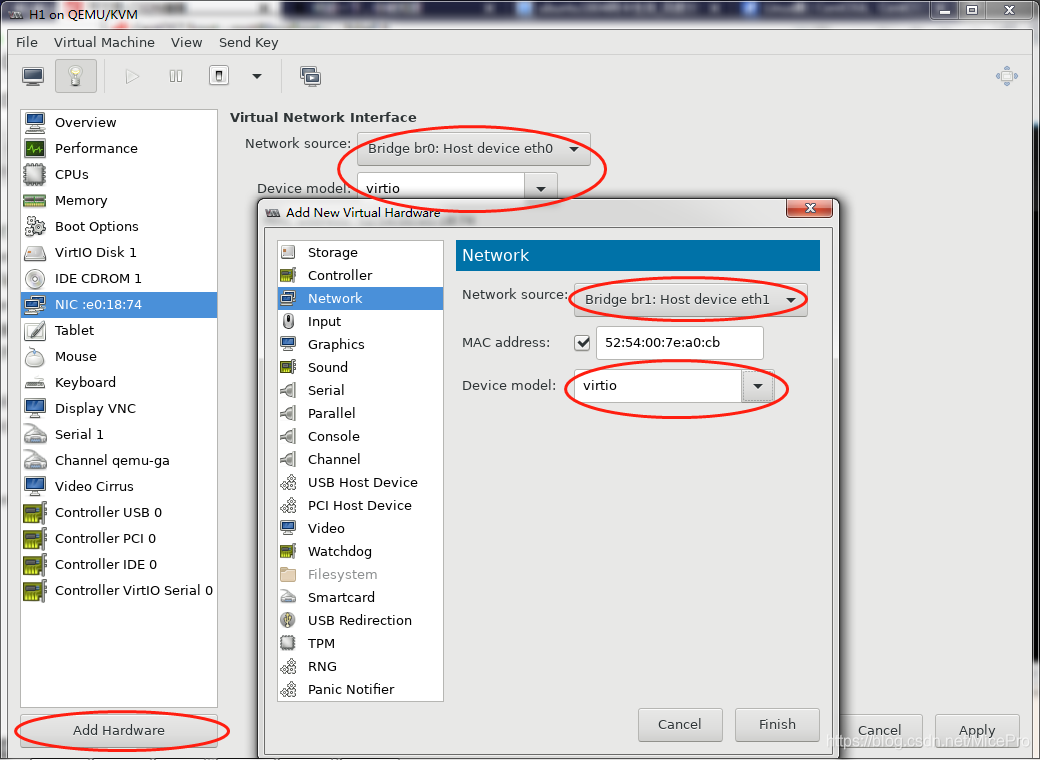
安装好CentOS7系统重启后,在vrit-manager的窗口中点击虚拟机info,给H1虚拟机添加一块网卡,并将两块网卡分别选择为主机的桥接网卡br0和br1,如下图所示1 2 3 4 5 6 7 8 9 10 vi /etc/sysconfig/network-scripts/ifcfg-eth0 TYPE="Ethernet" BOOTPROTO="static" IPADDR="172.18.32.85" GATEWAY="172.18.0.1" DNS1="180.76.76.76" DEFROUTE="yes" NAME="eth0" DEVICE="eth0" ONBOOT="yes"
1 2 3 4 5 6 7 8 vi /etc/sysconfig/network-scripts/ifcfg-eth1 TYPE="Ethernet" BOOTPROTO="static" IPADDR="10.0.0.85" DEFROUTE="no" NAME="eth1" DEVICE="eth1" ONBOOT="yes"
此时H1的基本配置就算完成了。/var/lib/libvirt/images/目录下,看到已经有一个镜像了了1 2 3 [root@ localhost ~]# ll /var/lib/libvirt/images/ total 1594308 -rw-r--r-- 1 root root 1632632832 Nov 29 18 :54 H1.qcow2
可以直接将此文件cp一份来当web1的磁盘文件1 2 cd /var/lib /libvirt /images / cp H1.qcow2 W1.qcow2
也可以在node2节点上的H2和web2虚拟机的磁盘文件。virt-install命令,创建另外三个虚拟机。1 2 3 4 5 6 7 virt-install --virt-type kvm \ --name W1 --ram 1024 --vcpus 2 \ --cdrom=/usr/local /src/ CentOS-7 -x86_64-Minimal-1908 .iso \ --disk=/var/lib /libvirt/images /W1.qcow2 \ --network network=default \ --graphics vnc,listen=0 .0 .0 .0 \ --noautoconsole
然后将W1强制终止,因为第一次是默认从光驱启动的,我们已经有系统了,不需要重装,重启后就发现已经是装好的系统,与H1一模一样的。1 2 3 4 5 6 7 8 TYPE ="Ethernet" BOOTPROTO ="static" IPADDR ="10.0.0.175" PREFIX ="16" DEFROUTE ="yes" NAME ="eth0" DEVICE ="eth0" ONBOOT ="yes"
对node2上的两个虚拟机采用同样方式创建。企业级应用:负载均衡层——haproxy(一) )之后,就可以将通过客户机就可以访问,后端web服务器了。
附一键安装脚本 HAProxy一键安装脚本 1 2 3 4 5 6 7 8 9 10 11 [root@HAProxy1 haproxy] # tree . ├── haproxy-2 .0 .8 .tar .gz ├── haproxy84 .cfg ├── haproxy .cfg ├── haproxy .service ├── haproxy .sh └── lua-5 .3 .5 .tar .gz 0 directories , 6 files [root@HAProxy1 haproxy] # bash haproxy .sh
1 2 3 4 5 6 7 8 9 10 11 12 13 14 15 16 17 18 19 20 21 22 23 24 25 26 27 28 29 30 31 32 33 34 35 36 37 38 39 40 41 42 43 44 45 46 47 48 49 50 51 52 53 54 55 56 57 58 59 60 61 62 DST="/apps" [ -a haproxy.cfg ] || { echo ' the absence of haproxy.conf' ;exit 1 ;} [ -a haproxy-2.0 .8 .tar.gz ] || { echo ' the absence of haproxy-2.0.8.tar.gz' ;exit 1 ;} [ -a haproxy.service ] || { echo ' the absence of haproxy.service' ;exit 2 ;} [ -a /usr/lib /systemd /system /haproxy .service ] && { echo ' haproxy is aready installed ' ;3 ;} id haproxy &>/dev/null && { echo 'user haproxy is exist' ; exit 4 ;} || useradd -r -s /sbin/nologin -u 79 haproxy yum install -y libtermcap-devel ncurses-devel libevent-devel readline-devel gcc make [ -a lua-5.3 .5 .tar.gz ] || wget http: //www.lua.org/ftp /lua-5.3.5.tar.gz tar xvf lua-5.3.5.tar.gz cd lua-5.3.5 make linux test yum install gcc gcc-c++ glibc glibc-devel pcre pcre-devel openssl openssl-devel systemd-devel -y mkdir -p $DST/haproxy cd .. tar xvf haproxy-2.0 .8 .tar.gz sleep 1 cd haproxy-2.0 .8 make ARCH=x86_64 \ TARGET=linux-glibc USE_PCRE=1 \ USE_OPENSSL=1 \ USE_ZLIB=1 \ USE_SYSTEMD=1 \ USE_CPU_AFFINITY=1 \ USE_LUA=1 \ LUA_INC=../lua-5.3 .5 /src/ \ LUA_LIB=../lua-5.3 .5 /src/ \ PREFIX=$DST/haproxy make install PREFIX=$DST/haproxy cat > /usr/lib /systemd/system /haproxy.service << "END" [Unit] Description=HAProxy Load Balancer After=syslog.target network.target [Service] ExecStartPre=/usr /sbin/haproxy -f /etc/haproxy/haproxy.cfg -c -qExecStart=/usr/sbin /haproxy -Ws -f /etc /haproxy/haproxy .cfg -p /var/lib /haproxy /haproxy .pid ExecReload=/bin/kill -USR2 $MAINPID [Install] WantedBy=multi-user.target\ END sed -i "s@/usr@$DST/haproxy@" /usr/lib /systemd /system /haproxy .service mkdir -p /etc/haproxy cd .. cp haproxy.cfg /etc/haproxy/ sed -i "s@chroot /apps/haproxy@chroot $DST/haproxy@" /etc/haproxy/haproxy.cfg mkdir -p /var/lib /haproxy chown 99.99 /var/lib /haproxy / -R cat >> /etc/sysctl .conf << END net.ipv4.ip_forward = 1 net.ipv4.ip_nonlocal_bind = 1 END sysctl -p systemctl enable --now haproxy systemctl status haproxy
Nginx+PHP一键安装脚本 1 2 3 4 5 6 7 8 9 10 11 12 13 14 [root@Web1 web] # tree . ├── nginx │ ├── nginx-1 .16 .1 .tar .gz │ ├── nginx .conf │ ├── nginx .service │ └── nginx .sh ├── php-fpm │ ├── php-7 .3 .10 .tar .xz │ └── php-fpm .sh └── web .sh 2 directories , 7 files [root@Web1 web] # bash web .sh
1 2 3 4 5 6 vim web.sh #!/bin/bash cd nginxbash nginx.sh cd ../php-fpmbash php-fpm.sh
1 2 3 4 5 6 7 8 9 10 11 12 13 14 15 16 17 18 19 20 vim nginx/nginx.sh DST="/apps" [ -a nginx.conf ] || { echo ' the absence of nginx.conf' ;exit 1 ;} [ -a nginx.service ] || { echo ' the absence of nginx.service' ;exit 2 ;} [ -a /usr/lib /systemd /system /nginx .service ] && { echo ' nginx is aready installed ' ;3 ;} id nginx &>/dev/null && { echo 'user nginx is exist' ; exit 4 ;} || useradd -r -s /sbin/nologin -u 80 nginx yum install -y gcc gcc-c++ glibc glibc-devel pcre pcre-devel openssl openssl-devel systemd-devel net-tools iotop bc zip unzip zlib-devel bash-completion nfs-utils automake libxml2 libxml2-devel libxslt libxslt-devel perl perl-ExtUtils-Embed vim lrzsz tree psmisc wget || { echo 'Dependencies is not installed' ;exit 5 ;} mkdir -p /data/apps/nginx ln -s /data/apps/ /apps [ -a nginx-1.16.1.tar.gz ] || wget https:/ /nginx.org/download /nginx-1.16.1.tar.gz tar xvf nginx-1.16.1.tar.gz cd nginx-1.16.1 ./configure --prefix=$DST/nginx --user=nginx --group=nginx --with -http_ssl_module --with -http_v2_module --with -http_realip_module --with -http_stub_status_module --with -http_gzip_static_module --with -pcre --with -stream --with -stream_ssl_module --with -stream_realip_module --with -select_module --with -file-aiomake -j 4 && make install cp ../nginx.conf $DST/nginx/conf/ cp ../nginx.service /usr/lib /systemd /system / systemctl enable --now nginx systemctl status nginx
1 2 3 4 5 6 7 8 9 10 11 12 13 14 15 16 17 18 19 20 vim nginx/nginx.service [Unit] Description =The nginx HTTP and reverse proxy serverAfter =network.target remote-fs.target nss-lookup.target[Service] Type =forkingPIDFile =/apps/nginx/logs/nginx.pidExecStartPre =/usr/bin/rm -f /apps/nginx/logs/nginx.pidExecStartPre =/apps/nginx/sbin/nginx -tExecStart =/apps/nginx/sbin/nginxExecReload =/bin/kill -s HUP $MAINPID KillSignal =SIGQUITTimeoutStopSec =5KillMode =processPrivateTmp =true [Install] WantedBy =multi-user.target
1 2 3 4 5 6 7 8 9 10 11 12 13 14 15 16 17 18 19 20 21 22 23 24 25 26 27 28 29 30 31 32 33 34 35 36 37 38 39 40 41 42 43 44 45 46 47 48 49 50 51 52 53 54 55 56 57 58 59 60 61 62 63 vim nginx/nginx.confuser nginx; worker_processes 2 ;worker_cpu_affinity 0001 0010 ;worker_priority -10 ;error_log logs/error.log info ;error_log /apps/nginx/logs/error.log error ;events { worker_connections 65536 ; use epoll ; accept_mutex on ; multi_accept on ; } http { include mime.types; default_type application/octet-stream; log_format access_json '{"@timestamp ":"$time_iso8601 ",' '"host":"$server_addr ",' '"clientip":"$remote_addr ",' '"size":$body_bytes_sent ,' '"responsetime":$request_time ,' '"upstreamtime":"$upstream_response_time ",' '"upstreamhost":"$upstream_addr ",' '"http_host":"$host ",' '"uri":"$uri ",' '"domain":"$host ",' '"xff":"$http_x_forwarded_for ",' '"referer":"$http_referer ",' '"tcp_xff":"$proxy_protocol_addr ",' '"http_user_agent":"$http_user_agent ",' '"status":"$status "}' ; access_log /apps/nginx/logs/access_json.log access_json; sendfile on ; keepalive_timeout 65 65 ; server_tokens off ; charset utf-8 ; gzip on ; server { listen 80 ; server_name www.example.net; location = / { root html; index index.html index.htm; } error_page 500 502 503 504 /50x.html; location = /50x.html { root html; } location ~ ^/(status|ping)$ { include fastcgi_params; fastcgi_pass 127.0.0.1:9000 ; fastcgi_param PATH_TRANSLATED $document_root $fastcgi_script_name ; fastcgi_hide_header X-Powered-By; } location ~ \.php$ { root html; fastcgi_pass 127.0.0.1:9000 ; fastcgi_index index.php; fastcgi_param SCRIPT_FILENAME $document_root $fastcgi_script_name ; include fastcgi_params; } } }
1 2 3 4 5 6 7 8 9 10 11 12 13 14 15 16 17 18 19 20 21 22 23 24 25 26 27 28 29 30 31 32 33 34 35 36 37 38 39 40 41 42 43 44 45 46 vim php-fpm/php-fpm.sh #!/bin/bash DST="/apps" [ -a php-*.tar.* ] || { echo ' the absence of php-7.3.10.tar.xz' ;exit 1;} [ -a /usr/lib/systemd/system/php-fpm.service ] && { echo ' php-fpm is aready installed' ;exit 2;} [ -a $DST /php* ] && { echo ' php is aready installed' ;exit 2;} mkdir -p $DST /php yum install libxml2-devel bzip2-devel libmcrypt-devel -y || { echo 'Dependencies is not installed' ;exit 5;} tar xvf php-*.tar.* cd php-7.3.10./configure \ --prefix=$DST /php \ --enable -mysqlnd \ --with-mysqli=mysqlnd \ --with-pdo-mysql=mysqlnd \ --with-openssl \ --with-freetype-dir \ --with-jpeg-dir \ --with-png-dir \ --with-zlib \ --with-libxml-dir=/usr \ --with-config-file-path=/etc \ --with-config-file-scan-dir=/etc/php.d \ --enable -mbstring \ --enable -xml \ --enable -sockets \ --enable -fpm \ --enable -maintainer-zts \ --disable -fileinfo make -j 4 && make install cp php.ini-production /etc/php.ini cp sapi/fpm/php-fpm.service /usr/lib/systemd/system/ cp $DST /php/etc/php-fpm.conf.default $DST /php/etc/php-fpm.conf cp $DST /php/etc/php-fpm.d/www.conf.default $DST /php/etc/php-fpm.d/www.conf sed -i 's@nobody@nginx@g' $DST /php/etc/php-fpm.d/www.conf sed -i '/#/!s@index index.html index.htm@index index.php index.html index.htm@' $DST /nginx/conf/nginx.conf sed -i 's@/scripts$fastcgi_script_name@$document_root$fastcgi_script_name@g' $DST /nginx/conf/nginx.conf $DST /nginx/sbin/nginx -s reloadsystemctl enable --now php-fpm
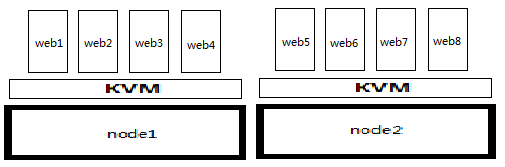
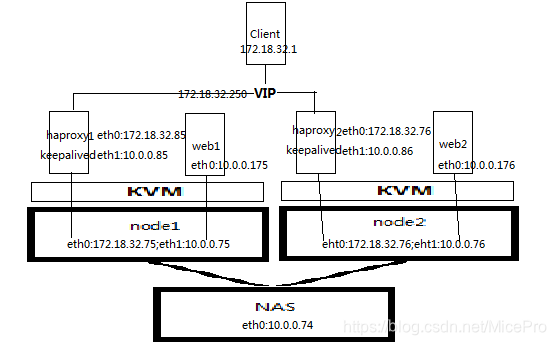 三个主机,其中两个主机node1和node2上运行KVM,另一台是NAS共享存储服务器,通过10.0.0.0/16网段内网连接。在node1上的用KVM构建虚拟机H1和W1分别运行haproxy+keepalived服务和nginx服务,其中H1桥接方式到node1的两块网卡上,W1桥接到内网网卡eth1上。node2节点中也是如此。于是,将Client端请求通过haproxy反向代理只内网的web服务集群中,保证负载均衡和高可用,哪怕一个物理节点服务器down掉也不影响客户服务访问。